Thursday, December 23, 2010

Outlook has reached the end of the e-mail. Do you want to continue searching at the beginning?

This message appears every time when you make search in Outlook 2010/2007 and you go email by email inside the Outlook folders. (Work environment is Outlook 2010/2007 with Exchange 2010)

"Outlook has reached the end of the e-mail. Do you want to continue searching at the beginning?"


Solution for this is to uncheck "Highlight search terms in the results"


File-> Options-> section Search->

To apply this setting in Corporate environment you can use this setting in Outlook 2010 ADM templates configuration:


Office 2010 Administrative Template files (ADM, ADMX, ADML) can be downloaded from here:

http://www.microsoft.com/downloads/en/details.aspx?FamilyID=64b837b6-0aa0-4c07-bc34-bec3990a7956&displaylang=en

Monday, December 20, 2010

ID: 4310 Details :Unknown error (0x84b20001)

During upgrade from DPM 2010 Eval to DPM 2010 Fully licensed I get the following error:

The SQL Server 2008 installation failed. Review the SQL Server installation log file for failures and take the appropriate action
ID: 4310 Details :Unknown error (0x84b20001)

 Starting directly SQL 2008 installation from DPM 2010 installation folder has shown following error:

"Long path names to files on SQL Server Installation media" failed

SQL Server installation media on a network share or in a custom folder can cause installation failure if the total length of the path exceeds 260 characters. To correct this issue, utilize Net Use functionality or shorten the path name to the SQL Server setup.exe file.

Solution for this issue is to make DPM 2010 Installation folder name shorter.
Ex: Rename SW_DVD5_Sys_Ctr_DPM_Svr_2010_64Bit_MultiLang_Core_MLF_X16-75365 to DPM2010


Wednesday, November 24, 2010

Disable ScheduledDefrag "Windows 7"

By default on Windows 7, Scheduled task for Defragmenting local HDDs is enabled to run Every Wednesday at 01:00 AM.  


You can disable this task using following command:

schtasks /change /tn "microsoft\windows\defrag\ScheduledDefrag" /disable

If you want to disable ScheduledDefrag to the Domain computers in your company then create a BAT file and include it as computer based GPO logon script.
After applying this GPO to the target computer run  taskschd.msc. The status of  ScheduledDefrag is disabled.

Monday, November 22, 2010

ADM Template to Disable Hibernation on Windows 7 via Group Policy

To disable Hibernation the HibernateEnabled registry key has to be 0 (zero) to the following registry path:

HKEY_LOCAL_MACHINE\SYSTEM\CurrentControlSet\Control\Power

Here is the ADM Template:
;------------------------------------------------------------------------------
CLASS MACHINE

CATEGORY !!System
CATEGORY !!PowerManagement
KEYNAME "CurrentControlSet\Control\Power"

POLICY !!Pol_Disable_Hibernation
EXPLAIN !!Explain_Disable_Hibernation

VALUENAME "HibernateEnabled"
VALUEON NUMERIC 0
VALUEOFF NUMERIC 1
END POLICY
END CATEGORY;
END CATEGORY;


[Strings]
System="System"
PowerManagement ="Power Management"

;------------------------------------------------------------------------------
; Options
;------------------------------------------------------------------------------
Options="Options"
Pol_Disable_Hibernation="Disable Hibernation on Windows 7"
Explain_Disable_Hibernation="Disable Hibernation on Windows 7"
;------------------------------------------------------------------------------

Save this text in file with ADM extension and import it to Windows Server 2008 GPO.

After applying this GPO and restarting the target computer, the hiberfil.sys file is deleted and Hibernate is removed from Windows 7 Start Menu.


Friday, November 19, 2010

ADM Template to Disable Sleep Buton on Windows 7 Start Menu via Group Policy

To disable the Sleep button onto the Windows 7 Start Menu, a registry key must be generated to the following location: HKLM\Software\Policies\Microsoft\Power\PowerSettings\abfc2519-3608-4c2a-94ea-171b0ed546ab

Generate the Dword "ACSettingIndex" and configure the value with the 0


Save the ADM template in file with ADM extension and import it in your GPO on Windows Server 2008:

CLASS MACHINE

CATEGORY !!System
CATEGORY !!PowerManagement
KEYNAME "Software\Policies\Microsoft\Power\PowerSettings\abfc2519-3608-4c2a-94ea-171b0ed546ab"

POLICY !!Pol_Disable_Sleep_Button
EXPLAIN !!Explain_Disable_Sleep_Button

VALUENAME "ACSettingIndex"
VALUEON NUMERIC 0
VALUEOFF NUMERIC 1
END POLICY
END CATEGORY;
END CATEGORY;
END CATEGORY;

[Strings]
System="System"
PowerManagement ="Power Management"

;------------------------------------------------------------------------------
; Options
;------------------------------------------------------------------------------
Options="Options"
Pol_Disable_Sleep_Button="Disable Sleep Button on Windows 7 Start Menu"
Explain_Disable_Sleep_Button="Disable Sleep Button on Windows 7 Start Menu"


After applying the GPO to the target computer the Sleep button is grayed out:

Thursday, November 18, 2010

Failure sending mail: The transport failed to connect to the server

When you configure SCCM Reporting services Subscription you get this error:

Failure sending mail: The transport failed to connect to the server


If your Exchange Server is configured to accept emails from SCCM server then you should configure or check your configuration in Reporting Services Configuration Manager. On left pane choose E-mail settings and after that on right pane enter user name and SMTP server.

Thursday, November 11, 2010

Capture image with ImageX

You want to create an WIM file from your Reference Windows machine. The reference machine is prepared with all necessary software and you sysprep this machine using:

sysprep.exe /generalize /oobe /shutdown /unattend:unattend.xml

Note: unattend.xml must exist in C:\Windows\System32\sysprep

To create a WIM file you need to boot in Windows PE mode and after that use Image.exe to capture the image and copy to network share, HDD or USB drive.

To boot from Windows PE you have to create Windows PE bootable USB drive:
http://tompopov.blogspot.com/2010/11/create-windows-pe-bootable-usb.html
After that, copy ImageX in the root of the USB drive.


ImageX is included in Windows AIK software. For Windows 7 you can download it from this site:
http://www.microsoft.com/downloads/en/details.aspx?FamilyID=696dd665-9f76-4177-a811-39c26d3b3b34&displaylang=en

There are different versions of ImageX which depend from computer architecture. For 64-bit machines ImageX is located in following folder:

C:\Program Files\Windows AIK\Tools\amd64


When your booting in Windows PE mode is done, press F8 to get command prompt.
By default CMD is redirected to X: drive.

In my case USB drive was F: drive. To execute ImageX command I switched to F drive and from there first I mapped network share using:

net use y: \\server\network_share\

After that to capture and to copy WIM file to network share I used:

F:\imagex.exe /capture c: y:\myimage.wim "Drive C" /compress fast /verify

C drive is currently the drive that was syspreped and that has to be captured and copied to network share.

Create Windows PE bootable USB

This can be done using SCCM 2007 R2 console. Right click on Task Sequence, choose Create Task Sequence Media:


Choose Bootable Media:

Choose USB Flash Drive:

Choose if you want to have support of Unknown computers, Protect Media with Password or Create Self-signed medias certificate or import existing one.

Choose Boot image, click Next and after that Finish.

Wednesday, November 10, 2010

Unable to sysprep the machine, hr=80004005

When you try to Capture Windows 7 using SCCM "Capturing Only" Task Sequence in C:\Windows\SysWOW64\CCM\Logs\SMSTSlog\smsts.log file you get these errors:

*******************************************
Sysprep did not complete successfully
Unable to sysprep the machine, hr=80004005
Sysprep'ing the machine failed, hr=80004005
*******************************************


This error can be caused by over sysprep-ing your reference machine.

Sysprep allows one machine to be sysreped 3 times.

How many times your machine is syspreped you can check out with this command:

slmgr.vbs /dlv


By default: Remaining Windows rearm count is 3.

To skip rearm process you can use this XML code that can be added to your unattend.xml file:

*settings pass="generalize">
*component name="Microsoft-Windows-Security-SPP" processorArchitecture="amd64" publicKeyToken="31bf3856ad364e35" language="neutral" versionScope="nonSxS" xmlns:wcm="http://schemas.microsoft.com/WMIConfig/2002/State" xmlns:xsi="http://www.w3.org/2001/XMLSchema-instance">
*SkipRearm>1*/SkipRearm>
*/component>
*/settings>

Note: At the begin of each line replace "*" with "<"

Here is the MS article related to this issue: http://support.microsoft.com/kb/929828

Note

You must make sure that the "SkipRearm" setting is removed from the final unattended file that is used to deploy computers in a production environment. If is not removed from the unattended file that is used to deploy computers in a production environment, the KMS current client count does not increase for new clients that are added to the network.

Tuesday, November 2, 2010

Autodesk Crosswalk 5.1 deploying using SCCM

Autodesk Crosswalk 5.1 can be downloaded from this link:

http://usa.autodesk.com/adsk/servlet/item?siteID=123112&id=13525184&linkID=12544121

The software installer setup_Crosswalk_5.1_windows.exe cannot be deployed silently because does not support any silent switch ex: /s /q

To resolve the issue you should extract this exe file using Universal Extractor.

http://legroom.net/software/uniextract

WinZIP, WinRAR, 7zip cannot extract this exe file.

After that in the extracted folder you can find setup.exe file and you can use setup.exe /s command to deploy this software silently.


For Silent uninstall this command can be used:

setup.exe /uninstall /s

There is another uninstall string for Crosswalk:

C:\Program Files\Autodesk\Crosswalk5.1\Setup\setup.exe -runfromtemp -l0x0009 -removeonly

Tuesday, October 19, 2010

Failed to download updates to the WUAgent datastore. Error = 0x800b0109.

This error has been shown on C:\Windows\SysWOW64\CCM\Logs\WUAHandler.log.


This issue happens when Adobe Flash Player 10.1.85.3 has been assigned by SCCM 2007 Software Update to target computer but the installation always failed.

The configuration is: SCUP 4.5 and SCCM 2007 are installed on same server, WSUS Self-Signed certificate created, issued and imported in Trusted Publishers and Trusted Root Certification Authorities in certificate store on Local Computer.

Solution for this is to import WSUS Self signed certificate to the local computer Trusted Publishers and Trusted Root Certification Authorities and to change this setting in GPO.
For that reason create a GPO which will import this certificate and enable Allow signed updates from an internet Microsoft update service location.


After this modification and GPO applying Adobe Flash Player has been installed successfully.

Monday, October 18, 2010

SCUP 4.5 Error: Publish: : Exception occured during publishing: Verification of file signature failed for file: \\SERVER\UpdateServicesPackage\.....

SCUP-System Center Updates Publisher 4.5 has been configured to download Third-party updates. Self assigned WSUS certificate is published, catalogs for downloading are configured but when publishing has been started there is an error:

"Publish: : Exception occured during publishing: Verification of file signature failed for file: \\server name\UpdateServicesPackages\bcc7176d-5168-4fcc-8ea1-6c4ddb4d2f69\2e66610e-8cf6-4518-a702-b0919cfae686_1.cab"

This error is located in UpdatePublisher.log Temp file on current user.

Solution for this issue is to copy the self-assigned WSUS Certificate to Trusted Publishers and Trusted Root Certification Authorities in certificate store on Local Computer.


After the certificates copy, third-party updates can be published and synchronized with SCCM Server.

Friday, October 15, 2010

Modifyig DELL BIOS Parameters using Task Sequences

Before to deploy OS on new DELL machine (Latitude, Precision) using Task Sequence in SCCM, BIOS can be configured with desired parameters.
This can be done using Dell Business Client Deployment Pack for SCCM .

This software can be downloaded from: http://content.dell.com/us/en/enterprise/d/solutions/dell-deployment-pack.aspx

After the installations of Dell Business Client Deployment Pack for SCCM on SCCM 2007 R2 Server or on computer where SCCM Console is installed, GUI Bare Metal Client Deploymens is integrated in SCCM Console.


There are two main modifications added in Task Sequence template; DiskPart clean and Set BIOS Config x86_64


To modify BIOS configuration before to install OS Set BIOS Config x86_64(ini file) can be used. Using Configuration file/Comand line parameters we can modify parameters, save them in customized INI file and deploy it with New Operating System Task Sequence.


In this case Wake On LAN is enabled into the ini file.

This BIOS setting will be applied on the machine before OS to be installed.

Wednesday, October 13, 2010

Modifying BIOS Parameters using Dell Client Configuration Utility

The BIOS Parameters can be modified and configured on DELL Desktops (Precision, OptiPlex & Latitude) using Dell Client Configuration Utility.

Dell Client Configuration Utility ver 3.0 can be downloaded here:

http://support.dell.com/support/downloads/download.aspx?releaseid=R204280&deviceid=19801&fileid=285029

After the installations there are possibilities to configure different BIOS settings. In my case I wanted Wakeup On LAN to be configured:


You can choose Aftter running: Restart computer, enter the value for minutes and click on Create BIOS Setting Package.

With this action an EXE file has been created. This file can be easily deployed using SCCM Server and BIOS Setting will be unified
on all machines .

SCCM task sequence log file locations

The first step to troubleshoot SCCM OSD Task Sequence issues to is check out the log file – this is called smsts.log.

This can be found in one of several locations depending on the progress of the build and the architecture of the OS:

  • Windows PE before HDD format: x:\windows\temp\smstslog\smsts.log
  • Windows PE after HDD format: x:\smstslog\smsts.log and copied to c:\_SMSTaskSequence\Logs\Smstslog\smsts.log
  • Full version Windows before SCCM agent installed: c:\_SMSTaskSequence\Logs\Smstslog\smsts.log
  • Full version Windows after SCCM agent installed: c:\windows\system32\ccm\logs\Smstslog\smsts.log
  • Full version Windows (x64) after SCCM agent installed: c:\windows\sysWOW64\ccm\logs\Smstslog\smsts.log
  • After Task Sequence has finished running: c:\windows\system32\ccm\logs\smsts.log
  • After Task Sequence has finished running (x64): c:\windows\sysWOW64\ccm\logs\smsts.log

Thursday, September 30, 2010

CWmi::Connect(): ConnectServer(Namespace) failed. - 0x80041001 error

When you try to manually push SCCM client installation, in ccm.log on SCCM Server, you get the following error:

  • CWmi::Connect(): ConnectServer(Namespace) failed. - 0x8004100e SMS_CLIENT_CONFIG_MANAGER 9/30/2010 12:19:17 PM 4496 (0x1190)
  • Unable to connect to WMI (r) on remote machine "computer name", error = 0x8004100e. SMS_CLIENT_CONFIG_MANAGER 9/30/2010 12:19:17 PM 4496 (0x1190)

To resolve this issues you must delete or rename the machines WMI Repository and allow it to recreate itself.

Follow the steps below to accomplish this on local machine:

1. Stop the "Windows Management Instrumentation" service.

2. Rename the %WinDir%\System32\Wbem\Repository folder to ”Oldrepository”.

3. Restart the “Windows Management Instrumentation service”.

4. Verify that the %WinDir%\System32\Wbem\Repository folder has been recreated.

5. Push again SCCM client software.

Monday, September 20, 2010

Assign computer name using Task Sequence Variable

The computer name can be assigned or changed during OS Task Sequence deployment.

OSDComputerName Task Sequence variable can be used for that purpose.


This variable has to be applied before "Apply Windows Settings".

Tuesday, September 14, 2010

Remotely rename computer name

This VBS script can be used to remotely rename computer name.
It is using netdom command and it is successfully tested on Windows Server 2008 R2 to rename Windows 7 machine.

Copy this text below into vbs script, modify the value for your "DOMAIN" and put your user with Domain Admin privileges;

*******************************************************
'On Error Resume Next

'open the file system object
Set oFSO = CreateObject("Scripting.FileSystemObject")
set WSHShell = wscript.createObject("wscript.shell")

Dim sNewCname 'Variable to hold Computer Name you enter in the inputbox
Dim sOldCname 'computers current name

'First param is message text, second is message title
sOldCname = InputBox("Enter computers current name","Windows Netdom Rename Script")
sNewCname = InputBox("Enter computers new name","Windows Netdom Rename Script")

Call WSHShell.Run("cmd.exe /K netdom renamecomputer " & sOldCname & " /newname:" & sNewCname & " /userd:DOMAIN\ADMINISTRATOR /passwordd:* /usero:DOMAIN\ADMINISTRATOR /passwordo:* /force ")

WScript.Echo "Click OK for reboot target machine"
set objWMI = GetObject("winmgmts:\\" & sOldCname & "\root\cimv2")
for each objOS in objWMI.InstancesOf("Win32_OperatingSystem")
objOS.Reboot()
next
**************************************************

Script is asking for old and new computer name, after that you should enter password for the user with Domain Admin privileges twice and click OK this machine to be rebooted remotely.

Friday, September 10, 2010

SCCM 2007 R2 Report: Patch compliance progression report

Copy the contents below and paste in SQL Based Report in SCCM 2007 R2 console:


_________________________________________

select

CS.Name0,
CS.UserName0,
case
when (sum(case when UCS.status=2 then 1 else 0 end))>0 then ('Needs '+(cast(sum(case when UCS.status=2 then 1 else 0 end)as varchar(10))+ ' Patches'))
else 'Good Client'
end as 'Status',
ws.lasthwscan as 'Last HW scan',
FCM.collectionID--,
from
v_UpdateComplianceStatus UCS
left outer join dbo.v_GS_COMPUTER_SYSTEM CS on CS.ResourceID = UCS.ResourceID
join v_CICategories_All catall2 on catall2.CI_ID=UCS.CI_ID

join v_CategoryInfo catinfo2 on catall2.CategoryInstance_UniqueID = catinfo2.CategoryInstance_UniqueID and catinfo2.CategoryTypeName='UpdateClassification'

left join v_gs_workstation_status ws on ws.resourceid=CS.resourceid
left join v_fullcollectionmembership FCM on FCM.resourceid=CS.resourceid
Where
UCS.Status = '2'
and FCM.collectionid = 'SMS00001'
Group by
CS.Name0,
CS.UserName0,
ws.lasthwscan,
FCM.collectionID
Order by
CS.Name0,
CS.UserName0,
ws.lasthwscan,
FCM.collectionID

Wednesday, September 8, 2010

Modify SendEmailToUserAlias Value in RSReportServer.config

By default user with "Browser" privileges cannot change the value in To field. This value is automatically populated with user name alias.


User with "Browser" privileges can modify the content of this field, if the value SendEmailToUserAlias from True is changed to False.

SendEmailToUserAlias=False

This value is located in RSReportServer.config file in the following folder: C:\Program Files\Microsoft SQL Server\MSRS10.MSSQLSERVER\Reporting Services\ReportServer


http://msdn.microsoft.com/en-us/library/ms157273(SQL.90).aspx

Friday, September 3, 2010

How to create SCCM-SRS Subscriptions for SSCM 2007

When you try to create own SCCM Subscription you get the following message:
"Subscriptions cannot be created because the credentials used to run the
report are not stored, or if a linked report, the link is no longer valid."

In order to allow users to create own SCCM Subscriptions it is necessary to configure these settings on SCCM Console:


For user name, SCCM user service account with Domain Admin privilege can be used.

Wednesday, August 25, 2010

How do I run a program automatically when Windows starts?


Go to the Registry editor (regedit.exe) and open this location..

HKEY_LOCAL_MACHINE\Software\Microsoft\Windows\CurrentVersion\Run

Right click on the Right pane and choose New->String Value.

Change the name of New Value #1 to your application.
Double click on it and on the Value Data box write the path to your application with the executable.
example: "C:\Program Files (x86)\Spark\Spark.exe"

Monday, August 23, 2010

Uninstall Windows Live Essentials 2011 Beta


Here is the procedure how Windows Live Essentials 2011 Beta can be uninstalled:

1. In Windows XP, Click on Start then click on Run.
In Windows Vista or Windows 7, Click on Start and go to the Start search text box

2. Type C:\Program Files\Windows Live\installer\wlarp.exe then press Enter

3. A new window will open. Select Uninstall and click on Continue

4. Select the Windows Live Program that you want to remove and click on Continue

5. Follow the on-screen instructions.

Wednesday, August 18, 2010

SCCM SRS Reports configuration


If you want to allow to certain users or groups to access on specific reports in SCCM 2007 with SQL Server Reporting services installed, follow these steps:

First create a AD Security group which will have permissions to browse SCCM SRS Reports. ex: SCCM_Report_access

Open SQL Server Management Studio and add this group in Security -> Logins.
In User Maping choose your SMS database on right side and click on public and db_datareader.


Next step is to allow SCCM_Report_access group to access on SCCM reports.
Open Web SCCM Reports : http://sccm/Reports/
Choose some link and click on Properties:

Click on Security:


Click on New Role Assigment:


Paste MYDOMAIN\SCCM_Report_access Group or user name field and choose Browser.


After that users members of SCCM_Report_access Group will have access to Hardware - General Reports.

If you want to deny access to specific report then you have modify permissions on that report explicitly.

To allow users to see reports you must assign Browser privileges to Security group or users starting from root (http://sccm/Reports/). With this action, because this permissions are inheritable all sub-links will have same permissions. If you don't want all reports to be seen by the users then you must modify permissions on each sub-link.

Tuesday, August 10, 2010

SCCM client cannot be pushed by SCCM Install Client Wizard

When I try to install SCCM client using SCCM Wizard in ccm.log file on SCCM 2007 server I'm receiving this error:

---> Failed to connect to \\TEST-WIN7-64-02\admin$ using machine account (5)
---> ERROR: Failed to connect to the \\TEST-WIN7-64-02\admin$ share using account 'Machine Account'
---> ERROR: Unable to access target machine for request: "VBMIPZAY", machine name: "TEST-WIN7-64-02", access denied or invalid network path.

Solution:
SCCM must use an account which have local admin privileges on the target machine.
This can be done in SCCM Console, Client Installation Methods, right click on Client Push Installation and on Accounts tab enter admin user account.

Note: You do not need to enable "Enable Client Push Installation to assigned resources" to use SCCM Client Install Wizard.

ADM Temlpate for Turn off Windows Movie Maker saving files to YouTube via GPO

Turn off Windows Live Movie Maker to upload files to YouTube can be done modifying the registry "SupportedMediaTypes" key.

The key is on the folowing location:
"HKLM\Software\Microsoft\Windows Live\PublishPlugins\YouTubePlugin\DefaultParameters"

or

"HKLM\Software\Wow6432Node\Microsoft\Windows Live\PublishPlugins\YouTubePlugin\DefaultParameters"

on 64-bit machines.


Changing its value to 0 will remove YouTube icon from Movie Maker's toolbar.

Custom ADM template to apply this GPO settings to Windows clients on machine level is following:

CLASS MACHINE

CATEGORY !!System
CATEGORY !!InternetCommunicationManagement
CATEGORY !!InternetCommunicationsettings
KEYNAME "Software\Wow6432Node\Microsoft\Windows Live\PublishPlugins\YouTubePlugin\DefaultParameters"

POLICY !!Pol_DisableYouTubePlugin
EXPLAIN !!Explain_DisableYouTubePlugin

VALUENAME "SupportedMediaTypes"
VALUEON NUMERIC 1
VALUEOFF NUMERIC 0
END POLICY
END CATEGORY;
END CATEGORY;
END CATEGORY;

[Strings]
System="System"
InternetCommunicationManagement ="Internet Communication Management"
InternetCommunicationSettings ="Internet Communication Settings"

;------------------------------------------------------------------------------
; Options
;------------------------------------------------------------------------------
Options="Options"
Pol_DisableYouTubePlugin="Turn on YouTube Plugin in MovieMaker"
Explain_DisableYouTubePlugin="Turn on YouTube Plugin in MovieMaker"

Wednesday, July 14, 2010

SCCM 2007 R2 Err: SMS Site Component Manager failed to install this component because the Microsoft Install. File for this comp (MP.msi) ...

After SCCM 2007 R2 installation on Windows Server 2008 R2 the following error is registered in Component Status in SMS_MP_CONTROL_MANAGER:

SMS Site Component Manager failed to install this component, because the Microsoft Installer File for this component (MP.msi) could not install.

Solution:
Removing the Config client installed on SCCM 2007 Server and modifying WEBDAV_schema.xml in C:\Windows\System32\inetsrv\config\schema\

with changing these values

/attribute name="allowAnonymousPropfind" type="bool" defaultValue="true" />
/attribute name="allowInfinitePropfindDepth" type="bool" defaultValue="true" />
/attribute name="allowCustomProperties" type="bool" defaultValue="false" />

helped me to resolve this issue.

Error after SCCM 2007 SP1 installation: Systems Management Server cannot create the object "SMS-Site-xxx" in Active Directory.

After the installation of SCCM 2007 SP1 this error is getting in Component Status in SMS_SITE_COMPONENT_MANAGER:

Systems Management Server cannot create the object "SMS-Site-ACM" in Active Directory.

Solution for this is to allow full control of the computer account the System Management container in AD:

1.Click Start, click Run, and then enter dsa.msc to open the Active Directory Users and Computers administrative tool.

2.Click View, and then click Advanced Features.

3.Expand the System container.

4.Right-click System Management. On the context menu, click Properties.

5.In the System Management Properties dialog box, click the Security tab.

6.Click Add to add the site server computer account and grant the account Full Control permissions.

7.Click Advanced, select the site server’s computer account, and click Edit.

8.In the Apply

Thursday, July 8, 2010

IE 8 issue: Message: Library not registered.

I installed Outlook 2010 but I kept Office 2007. After that for some reason I reverted back Outlook 2007. When I opened SharePoint home page, the scripts cannot be loaded and I've got an IE error:

******************************************************
Webpage error details

User Agent: Mozilla/4.0 (compatible; MSIE 8.0; Windows NT 6.1; WOW64; Trident/4.0; SLCC2; .NET CLR 2.0.50727; .NET CLR 3.5.30729; .NET CLR 3.0.30729; InfoPath.2)

Timestamp: Thu, 8 Jul 2010 14:15:57 UTC

Message: Library not registered.

Line: 2367
Char: 2
Code: 0

URI:http://sharepoint_server/_layouts/1033/init.js?rev=qX%2BG3yl4pldKy9KbPLXf9w%3D%3D
******************************************************

Solution is to run Office Diagnostics from Help menu of Microsoft Office Outlook 2007.

Friday, July 2, 2010

trace32.exe download

trace32.exe, a log viewer that provides a way to easily view and monitor log files created and updated by Configuration Manager 2007 clients and servers is included in Center Configuration Manager 2007 Toolkit V2.

You can download it from here:

http://www.microsoft.com/downloads/details.aspx?familyid=5A47B972-95D2-46B1-AB14-5D0CBCE54EB8&displaylang=en

Wednesday, June 23, 2010

Modifying Configuration.mof file on SCCM 2007 Server

To change the frequency of Client Access License (CAL) collecting data in Asset Inteligence in SCCM 2007, Configuration.mof has to be modified. Configuration.mof file is located on:
C:\Program Files (x86)\Microsoft Configuration Manager\inboxes\clifiles.src\hinv

Example:

// CAL tracking server side configurations and policy
[Singleton]
class CCM_CALTrackConfig
{
uint32 CALCollectionType;
uint32 CALCollectionFrequencyDays;
uint32 CALCollectionFrequencyMinutes;
uint32 CALCollectionTimeWindow;
string CALCollectionSupportedWindowsVersions;

};

instance of CCM_CALTrackConfig
{
CALCollectionType = 3; //0-Disabled, 1-User CAL, 2-Device CAL, 3-All
CALCollectionFrequencyDays = 2;
CALCollectionFrequencyMinutes = 60;
CALCollectionTimeWindow = 90;
CALCollectionSupportedWindowsVersions = "5.0,5.2,6.0";

};

Wednesday, June 9, 2010

Enable DNS Autodiscovery for ISA 2006 Server/Client

If you assign DHCP addresses on your network and you have DHCP Autodiscovery record for ISA clients enabled then you will not have problem with ISA client configuration and IE Proxy Server settings on IE.


But the problem starts when you have static IP addresses and DNS Autodiscovery does not work.

In that case Proxy settings on IE are not applied. If you want to use GPO to configure Proxy Server settings on IE you'll see that is not possible. Locally installed ISA client does not permit change of this setting using GPO. If you remove ISA client that GPO is applied without any problem to IE and IE Proxy Server setting is configured.

If you want Proxy Server settings to be applied to IE when you have static IP address configured, you have two choices:
- Remove ISA client or
- Enable DNS Autodiscovery Process

Let's review the second possibility:

DNS Autodiscovery process for ISA 2006 is not enabled by default. You should enable on ISA console. If you want to use DNS Autodiscovery you should change the port from 8080 to 80 because DNS does not recognize 8080 request.

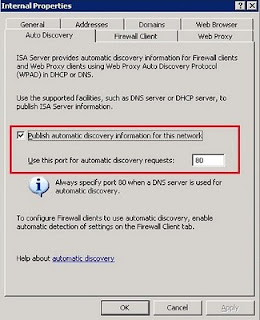
In this case when you change this port also if you want DHCP Autodiscovery to work the port on DHCP settings has to be changed from 8080 to 80.

http://your_ISA_Server:80/Wpad.dat

Next step is to update your DNS server with Host A record wpad.yourdomain to point to actual ISA server. This is neccesery because DNS Autodiscovery is asking for http://wpad/wpad.dat and http://wpad/wspad.dat. You can easely test if DNS Autodiscovery works when you past http://wpad/wpad.dat and http://wpad/wspad.dat in IE. If you get this file then DNS Autodiscovery works.

If you try to ping wpad.yourdomain you can see that is not possible. This is because wpad is blocked by default from Windows 2008R2 DNS. What you should do is to unblock it.

dnscmd [] /config /enableglobalqueryblocklist 0

Here is MS article for more information:
http://technet.microsoft.com/en-us/library/ee649250(WS.10).aspx

When this is change is done then DNS Autodiscovery will start to work !!!

Just click on Detect Now on ISA Client and your ISA Server will be Automatically detected.